How to Choose a Low-Profile Mechanical Keyboard
Compare typing height and travel, check which switches and keycaps fit, and hear what changes when the same low-profile keyboard switches from stock to silent linears.
1. Start with how you’ll use it
A low-profile mechanical keyboard makes the most sense when you want a board that slips into a bag and puts the keys close to the desk. If most of your typing happens on a laptop, a lower front edge and a short stroke can make the move to a separate keyboard feel familiar. Decide which of those benefits you want before comparing a dozen boards by their maximum thickness.
Then think about what you might change later. An office keyboard you enjoy at home may need quieter switches when you take it into a shared room. A board you buy for its layout might eventually need a new spacebar or replacement caps. Knowing what fits before you order gives you a better idea of the whole setup you are buying.
| Your priority | What to look for | Where to start |
|---|---|---|
| Carry it with a laptop | Width, weight, and thickness at the tallest point | Check layout and portability |
| Type comfortably for longer stretches | Front height, typing angle, and switch travel and force | Compare height and travel |
| Share a quiet room | An available silent option for the exact board | Listen to the Echo and Void comparison |
| Change switches later | A hot-swappable variant and a named replacement family | Check switch compatibility |
2. What changes when you go low profile?
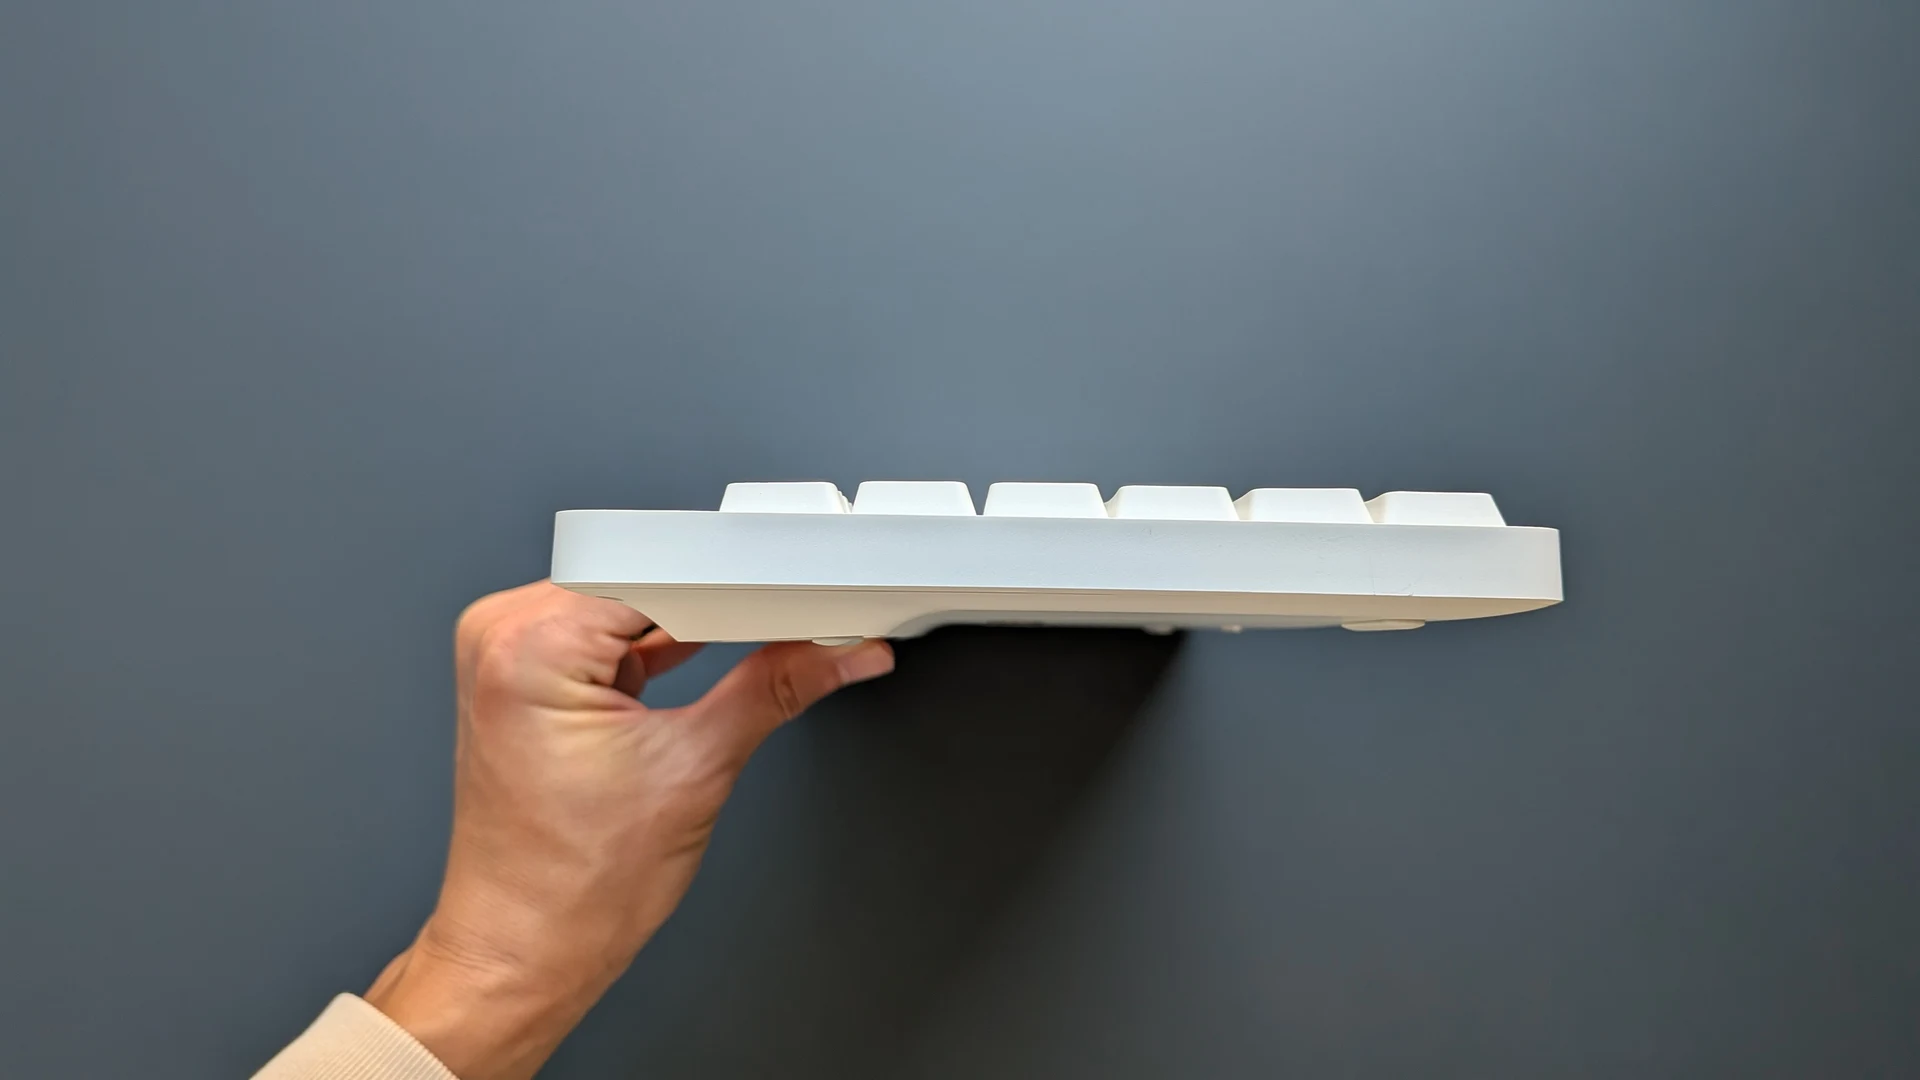
A slim board lowers the position of the keytops through some combination of shorter switches, shallow keycaps, and a thinner case. Each can change the typing experience. A thin case helps in a crowded bag, while the height of the row where you actually type matters when your hands are on the desk. Keychron, for example, gives the K3 Max a front height of 11 mm without keycaps and 17 mm with them. Choose readings taken the same way when comparing two spec sheets.
A laptop-style scissor key uses a shallow linkage under its cap. A low-profile mechanical keyboard can also sit close to the desk while offering the feel of a spring-loaded switch, such as a smooth linear stroke or an early tactile bump. A standard-height mechanical board can give you more room to press through the stroke. If you are coming from a laptop, try the arrow keys and spacebar as well as the letters. A different key shape or a higher front edge can feel more noticeable than a small difference in stated thickness.
Total travel is the distance from rest to the end of the press. Pre-travel is how far the key moves before it registers. Operating force tells you how much force the switch requires around that point. A short keypress can feel easy because the finger has less distance to move. A lighter spring and modest tactile bump can also make a switch easier to press. Those properties can vary independently. Lofree rates the first Flow Lite’s stock linear at 40 gf and the Flow Lite 2’s Echo at 45 gf, even though both are low-profile boards.
For another reference point, Cherry specifies 4 mm of total travel and 45 cN of actuation force for the standard-height MX2A Red. Those specs describe a noticeably longer stroke than the 2.8 mm of travel on Echo, with a broadly similar nominal force at actuation. The two force units are close in magnitude at these figures. Look at the rest of the advertised force curve if the amount of resistance near the bottom of the stroke matters to you.
For a feel check, picture something you do every day. If you brush resting fingers lightly across the keys, a very light switch can feel eager to register. If you strike decisively, pay attention to how suddenly the stroke ends. Also check whether you can fold the rear feet flat. Raising the back can improve the angle for some people, while a nearly flat setting is part of the reason others look for a slim board in the first place.
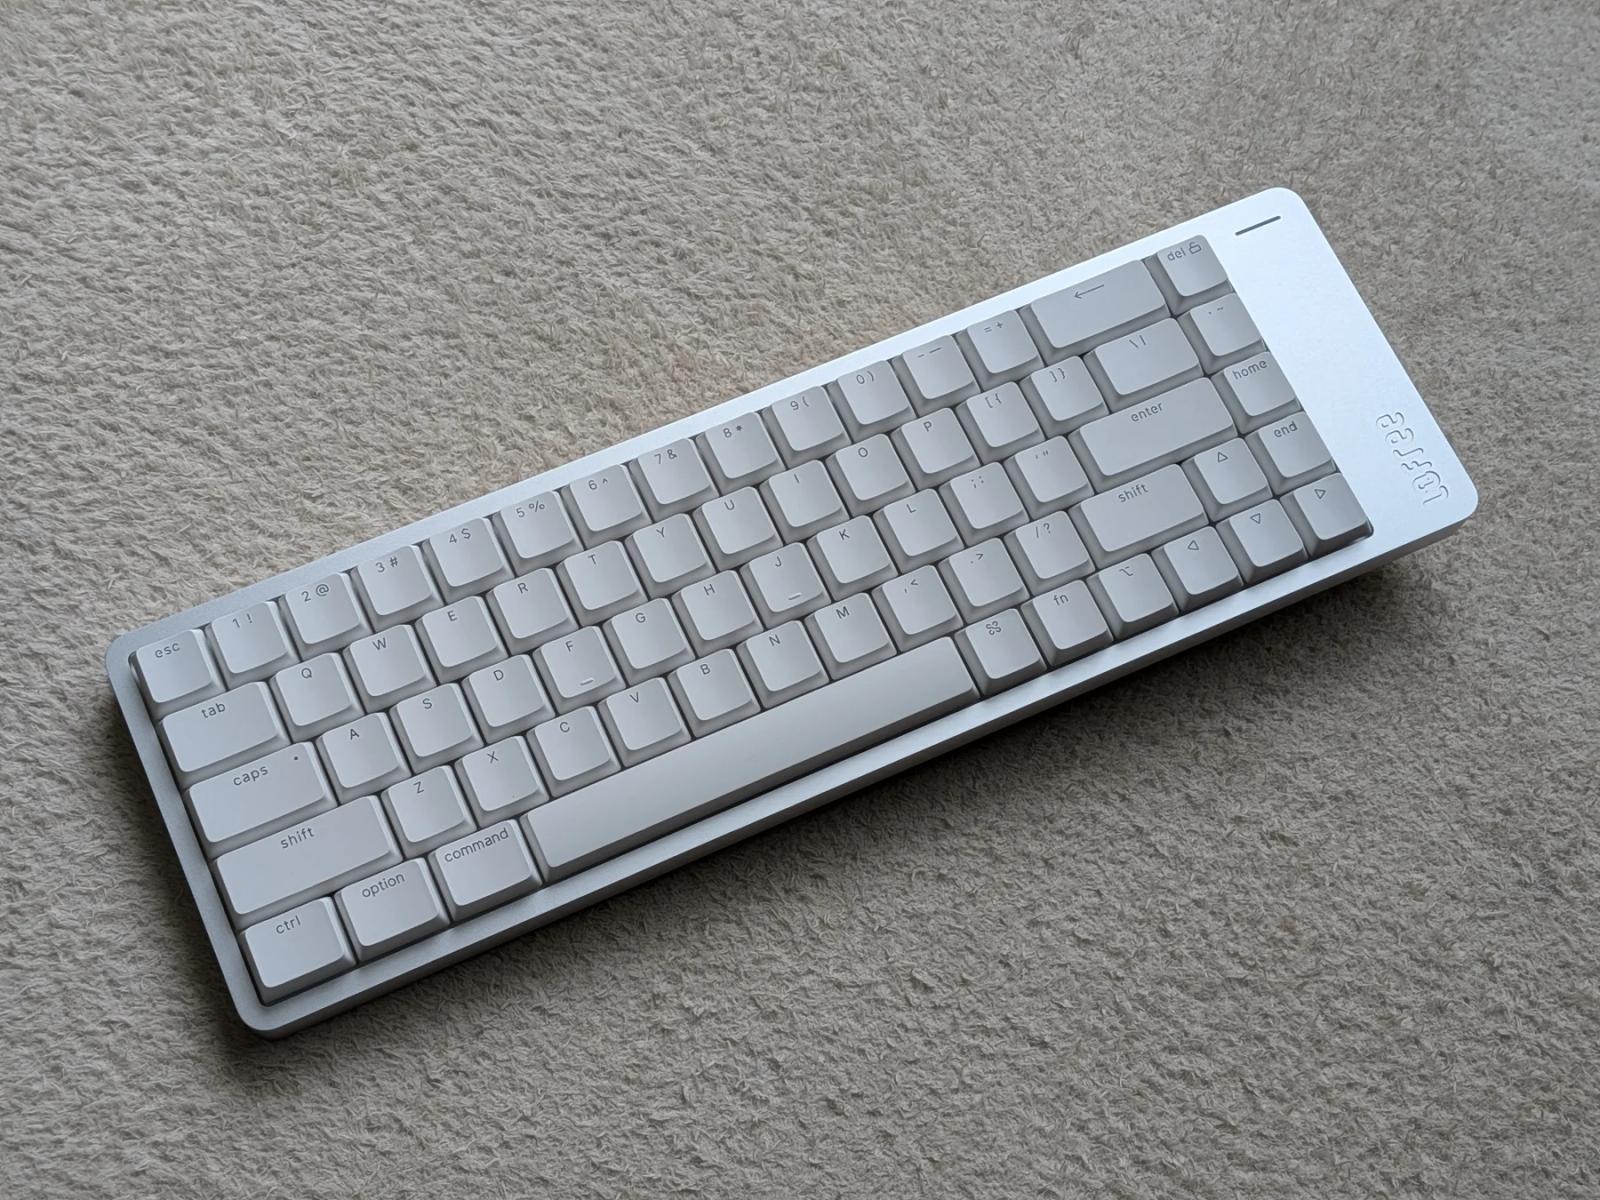
Keebpedia’s Flow Lite 2 review uses a white 84-key US ANSI unit. The broader key tops on that revision gave our reviewer more room to land between rows. That observation is about the shape on that board. If the keys on your current laptop are easy to locate by touch, compare the usable top surface and the homing marks on the new board before choosing it purely by its travel number.
3. Which switches will actually fit?
Start with the label on the keyboard or the exact option in your order. On a mechanical hot-swap board, the two metal terminals need to reach the socket contacts. A center post and any smaller locating pegs need corresponding openings. The switch housing needs to latch into the plate and sit at a height that gives the key room to travel. A cross-shaped stem tells you about the keycap connection. The terminal layout and the rest of the housing determine what the keyboard can take.
Pin counts are useful within a documented switch family. A three-pin mechanical switch generally counts two metal terminals and the center post. A five-pin version adds two locating pegs. The count leaves out the position of the contacts and the size of the post. Two three-pin switches made for different architectures can need different sockets. A low-profile magnetic or optical switch also depends on the sensor system of its board. Follow the replacement list for that version, even when the keyboard has a similar name to a mechanical model.
| Board or family | Documented fit | What to verify |
|---|---|---|
| Kailh Choc V1 / V2 | PG1350 and PG1353 have different mounting details and cap interfaces. | Read the PCB and cap listings. Some boards explicitly support both footprints. |
| Keychron K3 Max | The RGB Backlight (Hot-swappable) option supports documented Gateron or Keychron low-profile mechanical switches. | Read the actual option name and check the replacement switch list. |
| NuPhy Air75 V2 / V3 | V2 uses the earlier LP 2.0 family. V3 is listed for compatible LP 3.0 Nano replacements. | Match the board generation and the exact Nano SKU. |
| NuPhy Kick75 | NuPhy specifies a shared PCB for its supported low- and standard-height builds. | Check the conversion kit for the target profile. |
| Lofree Flow Lite 2 84 | Lofree offers Void as an add-on. Keebpedia installed and recorded it on this board. | Check the exact model and named replacement, including for other Kailh-made switches. |
Kailh Choc V1, Choc V2, and Lofree
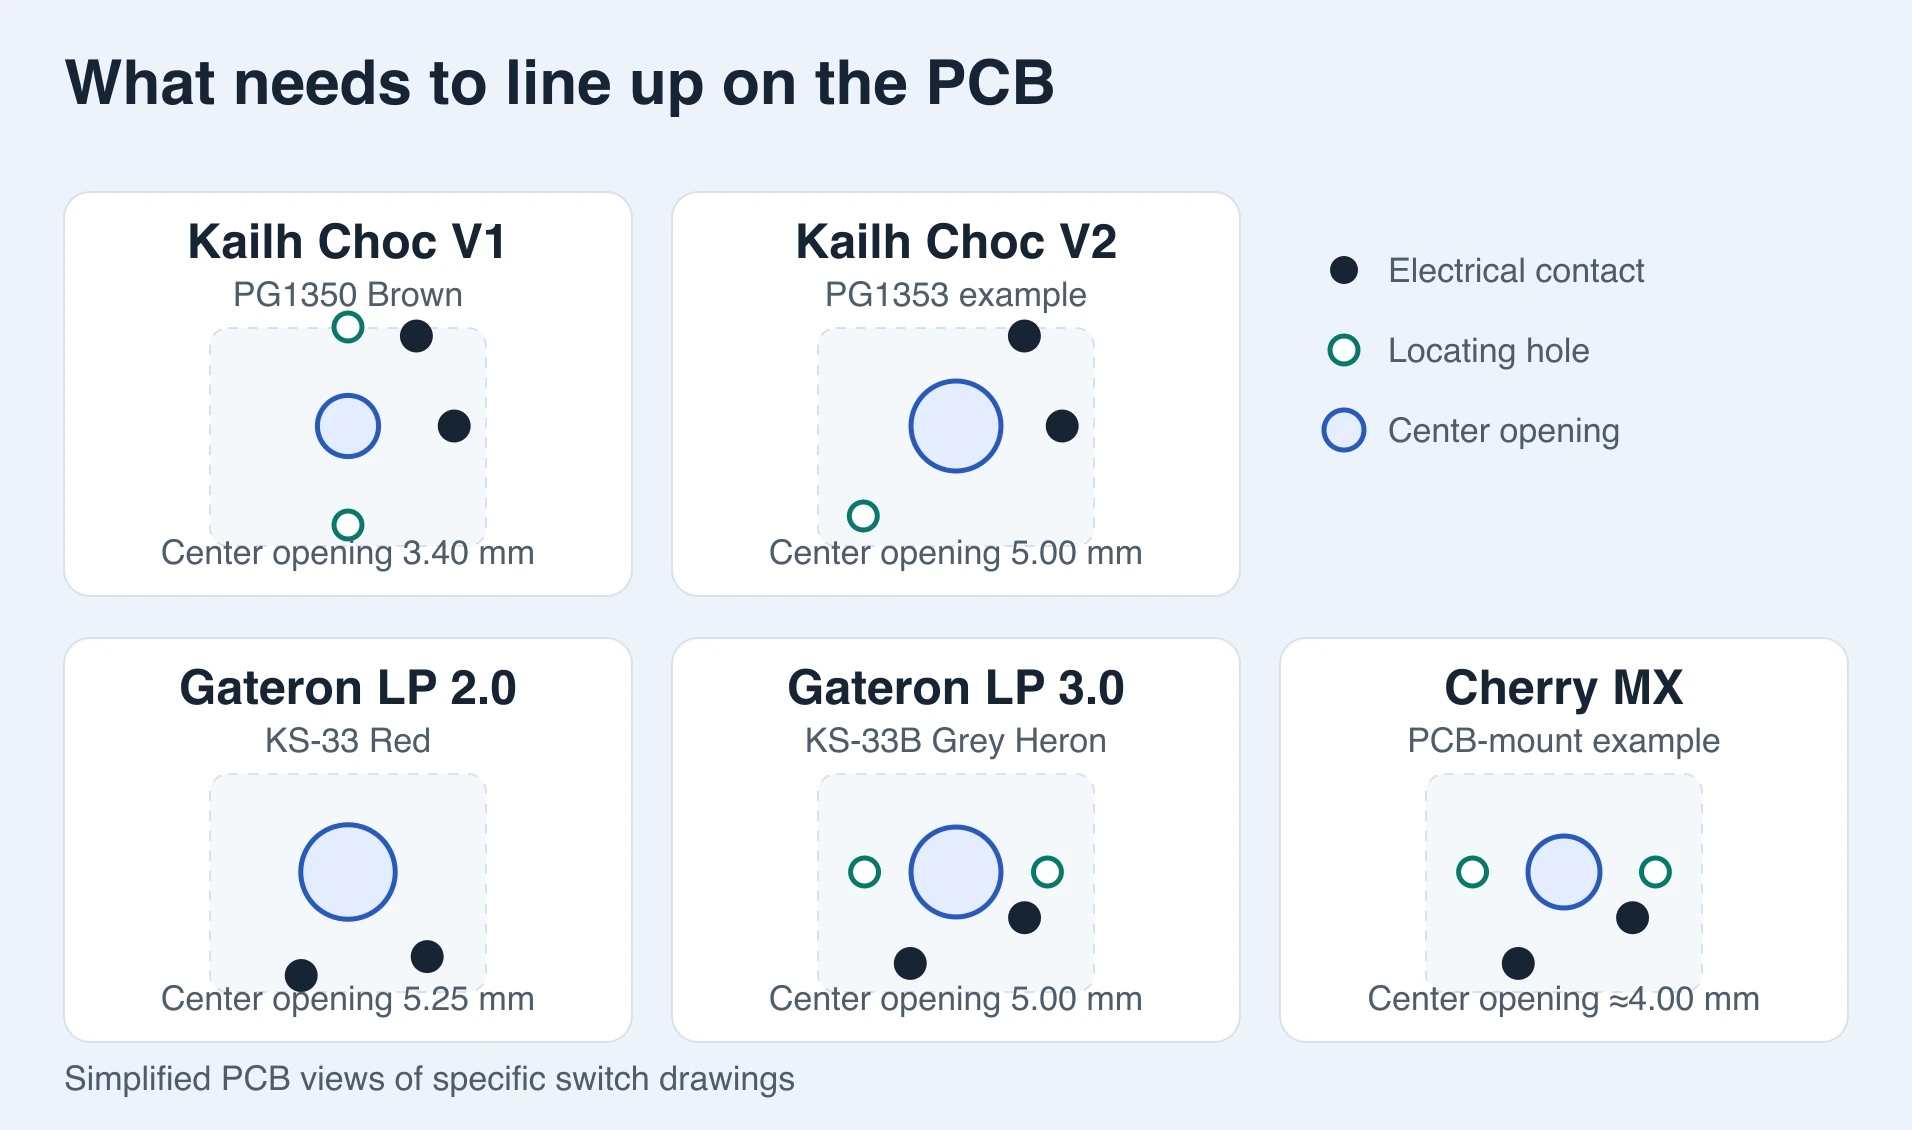
Kailh’s PG1350 drawing for Choc V1 shows a 3.4 mm center opening and two locating holes. The PG1353 example for Choc V2 calls for a 5 mm center opening and places a locating hole in a different position. The two electrical contacts line up when you orient the drawings the same way. That lets a board designer support both with the appropriate pattern, while a V1-only board with the smaller center hole cannot seat the V2 example. The V1 cap mounts through two slots. The V2 example uses a cross-shaped mount. Look for PG1350 or PG1353 in both the board and switch descriptions.
Kailh also co-develops switches for the Lofree Flow family. The Flow Lite 2 84 ships with Echo, and Lofree offers the silent Void as an add-on. Our US ANSI 84-key review unit accepted Void and appears in the sound comparison below. That is a specific pairing with a maker listing and an actual swap behind it. When shopping for a separately sold Kailh Choc V2, look for support for your exact Lofree model and the exact switch variant before buying a full set.
This is especially helpful when you are shopping for a discontinued color or a used board. Ask for a photo of the label under the case and a photo of the packaging for any spare switches included. If the owner describes them only as Kailh low-profile switches, use the model and part number in the photos to trace the combination back to a maker’s list. A confirmed pairing from another Flow generation leaves your own board’s fit to check.
Gateron LP 2.0, LP 3.0, and the MX pin layout
The original Gateron Low Profile KS-27 and the LP 2.0 KS-33 appear in some of the same keyboard families. Keychron lists specific K1, K3, and K7 mechanical models among the keyboards for its LP 2.0 replacements. Read the full model and option because the maker also lists versions that require soldering and separate optical versions. The ability to use an LP 2.0 part in a named older keyboard is useful when the original switch is hard to find.
LP 3.0 brings a different footprint in the examples shown here. For instance, the manufacturer drawings for the LP 2.0 Red and LP 3.0 Grey Heron show the terminals in different positions relative to the center. Gateron lists both three-pin and five-pin LP 3.0 switches across its range, so the extra pegs are only part of the difference. Treat an Air75 V2 and an Air75 V3 as separate compatibility checks. The third-generation model appears on NuPhy’s LP 3.0 switch page, while NuPhy documents the earlier KS-33 platform for the Air75 V2.
NuPhy says the Nano design aligns the pin layout with standard-height mechanical switches. Kick75 is the practical example. Its PCB was designed for both profiles, and NuPhy offers conversion kits with parts for the target build. A shared contact position answers one part of the fit question. The board still needs the appropriate center opening, plate, stabilizer arrangement, and clearance. Use the board maker’s documented conversion path when a model offers one.
In the diagram, the LP 3.0 Grey Heron example and the PCB-mount Cherry MX example illustrate the distinction. The contacts and locating holes align in the two drawings, while Gateron calls for a 5 mm nominal center opening and the Cherry example calls for about 4 mm. Those are PCB recommendations for the pictured parts. For a board other than Kick75, look for the specific pairing in the documentation or ask the maker whether the available plate and housing have clearance for the switch and cap.
Find the hot-swappable variant on a product page
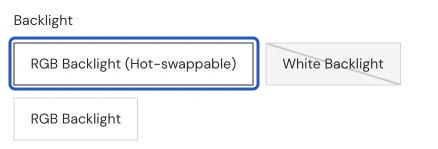
Open the Keychron K3 Max listing and look under Backlight. The selector has an option named RGB Backlight (Hot-swappable). The same selector can show an RGB Backlight option without that qualifier. Check the exact option in the cart or on an existing receipt. After you identify the hot-swappable build, use Keychron’s replacement switch list to match the mechanical switch. If you were looking at NuPhy instead, the equivalent check is to compare the Air75 V2 or V3 model name with the compatibility line on the switch pack.
For a first swap, pick the switch before you pick a quantity. A sample pack lets you try a letter or a modifier in the position that matters. On a supported hot-swap board, turn it off, follow the maker’s removal instructions, and check that the new switch sits flat and registers before filling the whole row. If the part stops partway in, check its terminals and the board’s fit requirements before pressing harder.
4. Will your replacement keycaps fit?
Start with the underside of one letter cap. Check that the mount matches the switch stem. Then look at how far the cap’s walls extend down around the switch. A standard-height cap can mount on a cross stem and still sit low enough around the housing to touch the plate or nearby parts before the keystroke finishes. Check that a suitable sample seats, moves through its full travel, and returns freely. The row and orientation can affect clearance, so use the position that you want to replace.
Next check the wide keys. Measure the spacebar width in keyboard units and compare the position of its center mount and both stabilizer mounts. Enter, Backspace, and Shift need the right widths and mounting positions too. Similar cap sets can use different stabilizer arrangements, and a fit check on the letter keys leaves those differences unresolved. If you type on ISO or JIS, open the diagram for that layout. The shape of Enter, shorter modifiers, and a split spacebar can change the contents of the kit you need.
A manufacturer’s model list can save a lot of guesswork. Keychron’s LSA Version 2 kit specifies ANSI and lists its supported series including low-profile K Max models. For a K3 Max with ANSI, check the model family and the kit diagram together. For an ISO board, find the corresponding physical layout in a kit that explicitly provides those keys. Coverage for an 84-key board also tells you little about whether the same kit has a suitable numpad zero or a different navigation row on a 96% board.
Decide which caps you plan to change. A set of letters can change texture without touching the stabilizers. A full colorway gives you more keys to verify, especially on a regional layout. If you already own a standard-height set, the measurement method in the GMK Keycaps Guide is useful for matching widths. For a low-profile board, add the clearance and stabilizer checks before you count that set as usable.
A familiar label such as 75% tells you roughly what is present on a keyboard. The kit still needs to supply the correct widths and shapes for the keys around that board’s arrows and on the bottom row. Compare a photo of the assembled board with the keycap kit sheet, key by key, and mark the caps you intend to reuse. In Lofree’s 84-key regional renders, the US ANSI option and the Japanese JIS option even have different spacebar arrangements within the same product listing.
5. What you can change about the sound
Listen to the two 84-key clips at the same playback volume. The first uses the stock Echo switches and the second uses Void silent linears in the same board. The recording description identifies the keycaps, gasket mount, and installed foam. This is a comparison of the sound of those two setups as recorded. Use it to hear the character of the change, including the shorter and softer impacts with Void, and to decide whether it is worth looking for a silent option.
Echo’s sharp metallic ring stood out to our reviewer on the 84-key unit. Listen after a strike as well as at the initial impact. Void softened the sound in the same keyboard to our ears. There is a third assembled-board clip using Echo in the 100-key model. Its larger layout and case are additional variables, so the two 84-key clips are the useful pair for hearing the switch swap. The final segment presses Echo, Surfer, and Void outside the keyboards. It gives you another way to hear the ring our reviewer noticed, alongside the recordings of the complete build.
A quiet switch can change the feel under the fingers along with the volume of the impact. Take a moment to listen to the return as well as the landing. The spacebar and Enter can still sound different from the letter keys because they use larger caps and stabilizers. In a shared office, you may care more about those isolated sharp sounds than about a smooth run of quiet letters. The Silent Switch Guide has more examples of how damped switches sound in a complete keyboard.
If a sound clip makes you favor a particular keyboard, check the configuration listed with the video before ordering. The stock linear, a silent replacement, and a tactile option on the same product page can each give the board a different character. Where a seller charges separately for the quiet switches, check the pack size against the number of keys you want to change. Start with the whole typing area and decide whether the sound of the longer keys warrants changing those switches too.
When a standard-height board gives you more room to tune
If the sound itself is the reason you want to build a keyboard, we would start with a standard-height custom board. The cases we consider for a fuller sound often have more room beneath the assembly, and the range of available plates, switches, and keycaps gives us more combinations to try. That matters when we want to keep a defined bottom-out while changing its pitch or how long the case rings after a press.
Case depth is one variable in that choice. The material and shape of the case, the plate, the way the assembly is mounted, the amount of damping, and the caps can all change the result. An open-sounding build may have a low note you like or a hollow resonance you want to damp. A compact board with well-matched parts may have exactly the brisk, clear note you prefer. In our keyboard sound guide, we use terms like bottom-out and ping to describe what we hear before deciding what part to change.
Think about the sound you want in terms you can hear. A richer sound might mean a lower note, a more defined impact, or a little more resonance after the strike. A quieter sound can mean softer impacts with less audible return. If you want easy transport and lower noise, the Echo and Void comparison is a concrete example of a useful swap. If you want to keep changing parts to shape a particular sound, check the range of parts available for a standard-height build before choosing.
For a sound-focused purchase, listen to a few candidate builds and write down what you want to keep from each. A soft return can go with either a deep or a bright bottom-out. A case with a longer audible tail can sound satisfying in a single keystroke and busy through a full paragraph. Those are choices worth making with the complete build in mind, especially if you type alongside other people.
6. Choose a layout, weight, and connection
Lay a ruler across the space your keyboard will occupy and write down the keys you actually use. A 75% board gives you a function row and arrows in a compact arrangement. A 96% board makes room for the numpad and may crowd some navigation keys into new positions. Lofree lists the Flow Lite 2 84 at 317 mm wide and 536 g and the 100 at 374 mm and 625 g. Both share the listed case height. The extra 57 mm of width can be more important than thickness if the keyboard is meant to go into the same laptop sleeve.
Check width, height, and weight for the exact configuration. A large metal case can be slim and still take up a noticeable share of the weight in your bag. Allow room for a sleeve or case and check whether any knob or raised feet extend beyond the listed height. At a desk, decide where the mouse will sit with the larger layout. If you reach for a numpad only occasionally, think about how much of the week those extra keys will be useful.
Match the connection to the machines you use. Bluetooth can be convenient when you switch between a laptop and a tablet. A dedicated 2.4 GHz receiver needs a port or adapter of its own. Wired USB can be useful at a fixed desk and when a keyboard’s configuration utility needs it. If battery life is important, read the vendor’s conditions for its estimate, including the connection mode and backlight setting.
Check Mac support at the same level of detail. A board may provide Mac modifier caps and an operating-system toggle. A dedicated Mac layout can also change the physical bottom-row arrangement and its shortcuts. The Flow Lite 2 includes Mac layout caps, while Lofree separately shows a Flow 2 for Mac with its own physical layout. If you rely on specific media keys or tap-and-hold shortcuts, check the manual and the remapping software for the exact model. The Keebpedia keyboard catalog is a starting point for comparing the models and their available layouts.
For a laptop setup that moves between rooms, also check what comes in the box. A receiver and a detachable cable are easier to manage when you know where they will live. For a fixed workstation, leave space behind the keyboard for the plug or a cable bend. The difference between the published dimensions and the space needed to use the board matters most when you are fitting it into a narrow shelf, tray, or bag.
7. Before you order
Save the exact variant name along with the product page. If you are buying the keyboard mainly for its stock feel, verify the switch option, the front height and angle, and whether the layout puts navigation keys where you expect them. If you expect to tune it, check that the parts you want are actually sold for that version.
- Read the model, generation, physical layout, and hot-swap status on the same listing or order line.
- Check the maker’s compatibility list for the exact switch pack. Record its SKU if the same name appears on several generations.
- For replacement keycaps, check the mount and clearance, then compare the stabilized keys and bottom-row sizes with the kit diagram.
- Listen to the stock switch in the intended build. If you want a quieter version, check which silent switch fits and how many you would need.
- Check the full cost with replacement parts and shipping, plus the keyboard’s weight and packed width if it will travel with you.