What Is a 60% Keyboard? Layout, Arrow Keys, and 60% vs. 65%
See how a 60 percent keyboard fits on a desk, where its arrow keys can go in VIA, and what changes when you move to a 65% keyboard. Hear two aluminum O-ring builds using the same switch model.
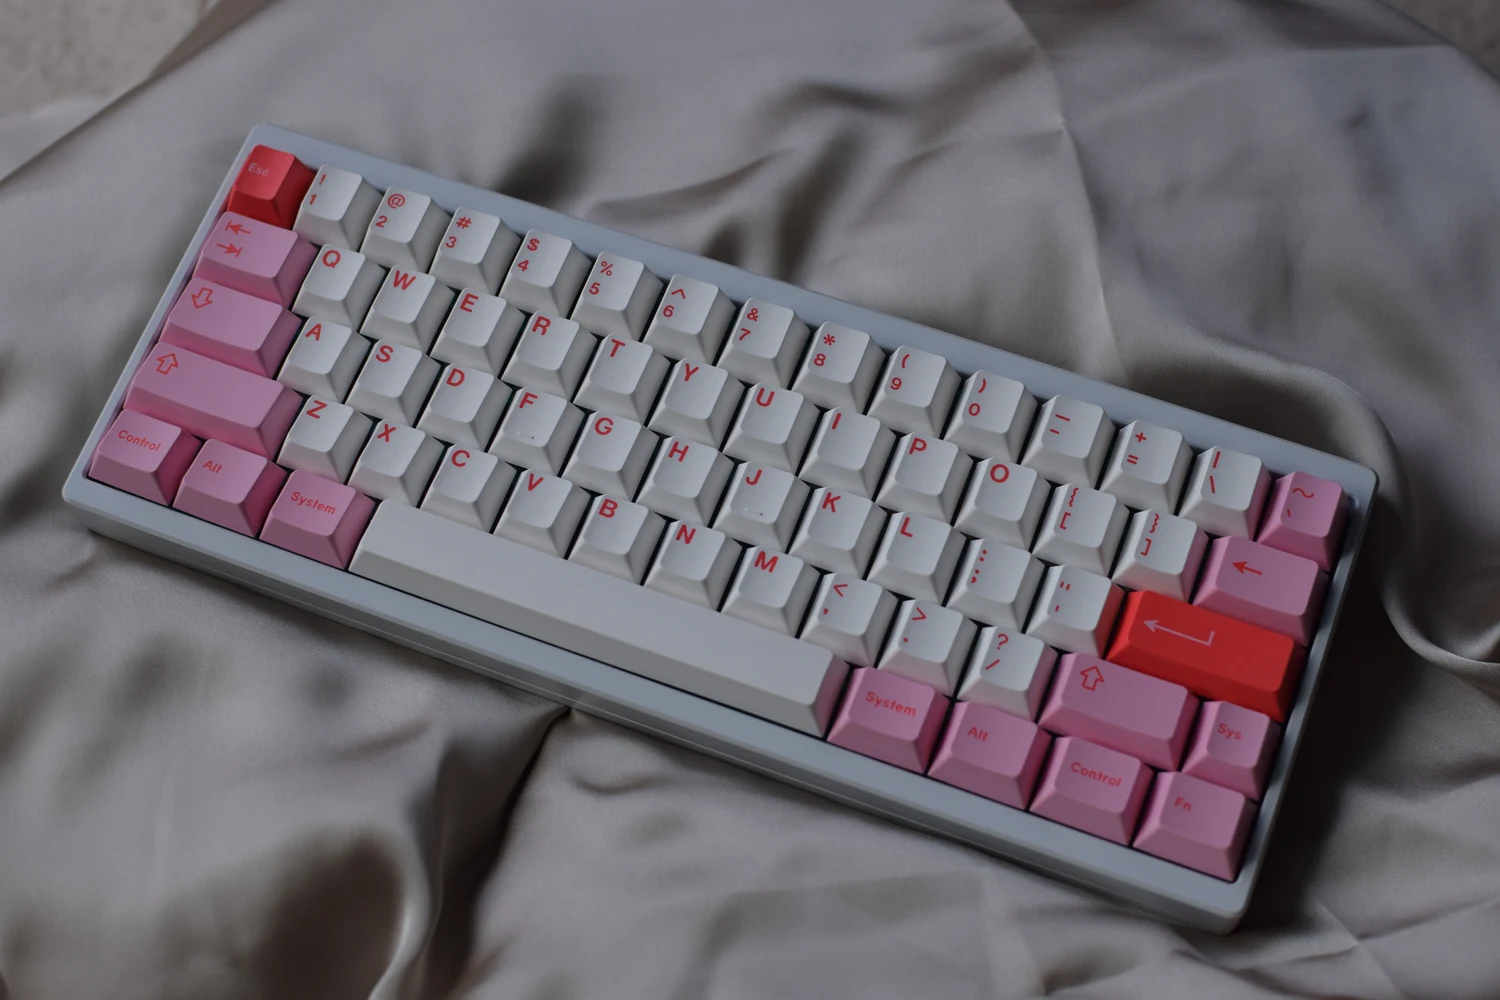
1. What is a 60% keyboard?
A 60 percent keyboard keeps the main typing block of a full-size keyboard. A typical US ANSI example has 61 physical keys, including the number row, the letters, and the usual typing modifiers. The separate function row, navigation block, and number pad are gone. On the familiar 61-key layout, arrows also move off the main set of keys. A function layer lets you send those commands from keys that are already on the board.
A typical 65% keeps almost the same typing block and makes room for an inverted-T arrow cluster and a short column of navigation keys. The exact keys in that column vary. One board might put Delete and Page Down there, while another has Home or End in a different place. The function row usually still lives on a layer. If you need a particular key without a chord, look for it in the layout photo.
The percentages are names for form factors. Manufacturers still have room to change the physical layout, key count, and exterior dimensions. NuPhy’s Air60 V2, for example, is listed as a 64-key 60% board and has physical arrows. That matters when you see the same size label on a 61-key ANSI board and on a more compact arrangement with an arrow cluster. Start with one feature you care about and use the table to find the relevant comparison.
| What you need | Typical 60% | Typical 65% | Where to look |
|---|---|---|---|
| A narrower board | 61-key ANSI typing block | 68-key ANSI example with an extra column | Compare desk dimensions |
| Arrow keys | Fn layer or remapped positions | Dedicated arrow cluster | See the VIA arrow setup |
| Delete, Home, and End | Functions depend on the keymap | Some navigation keys have their own positions | Compare everyday shortcuts |
| Function row and number pad | Usually no separate F-row or numpad | Usually no separate F-row or numpad | Compare everyday shortcuts |
| Replacement keycaps | Check the exact bottom row and Shift keys | Check the shorter Shift and navigation caps | Check keycap fit |
| Typing sound | Bakeneko60 recording | Mikeneko65 recording | Hear both builds |
2. 60% vs. 65% on the same desk
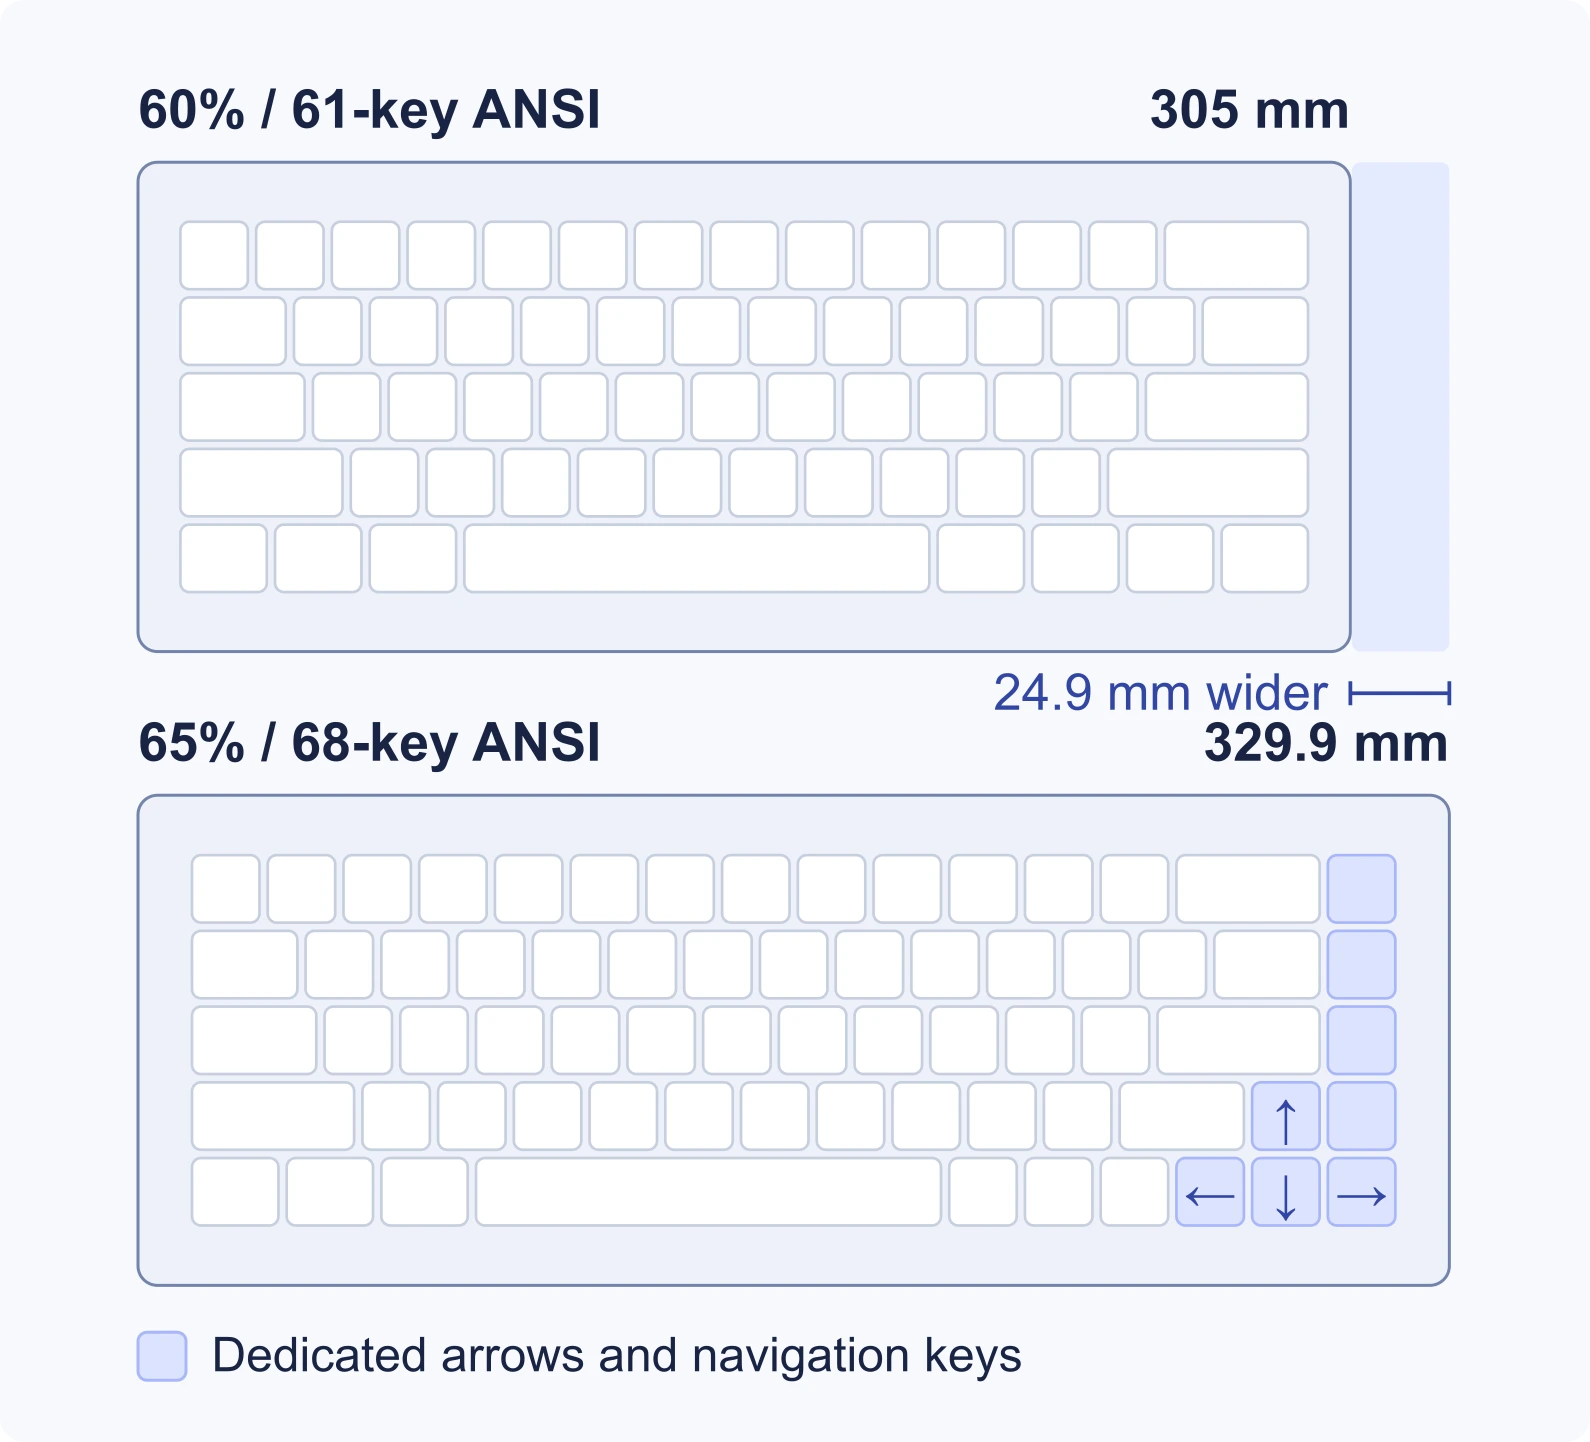
The two outlines below share a scale and a left edge. The key patterns depict typical ANSI examples. The outer dimensions use two products from the same Keychron series as a reference. Keychron lists the 60% V4 Max at 305 mm across and the 65% V2 Max at 329.9 mm across. With their left edges at the same point, that puts the right edge of the V2 Max 24.9 mm farther into the desk area.
The part to look at is the lower right corner. A familiar 60% ends near the right edge of the main typing block. The 65% makes room for the up arrow near the right Shift and moves the other three arrows into the bottom row. The extra column also gives several editing keys a place to sit. In a real case, the thickness of the bezels and the gaps around the arrow cluster can change how much room those keys use.
Try the example dimensions where your board sits. Put a strip of tape at 305 mm and another at 329.9 mm, measured from the same starting point. Move your mouse as far as you usually do and see whether either edge interferes. If you center the letters under your hands, align the typing area when making the comparison. A fixed left edge is a convenient reference for the illustration. At your desk, your hands and the mouse may set a different reference.
If the board is going into a sleeve, measure the sleeve’s opening and compare that with the actual case and its widest point. A knob, feet, or a plug can also matter for a tight shelf or case. The illustration gives you a sense of the trade you are making. Measurements from the exact product listing are what you need for a close fit. A board can be narrow and still weigh as much as you would want to carry.
A compact layout and a low-profile design answer different questions. A 60% layout saves horizontal space by changing the keys and their arrangement. A low-profile board also changes how high and how far your fingers move. If a laptop sleeve or a high front edge is the main reason you are shopping, see the Low-Profile Mechanical Keyboard Guide alongside the measurements here.
3. How I use arrow keys on a 60% keyboard
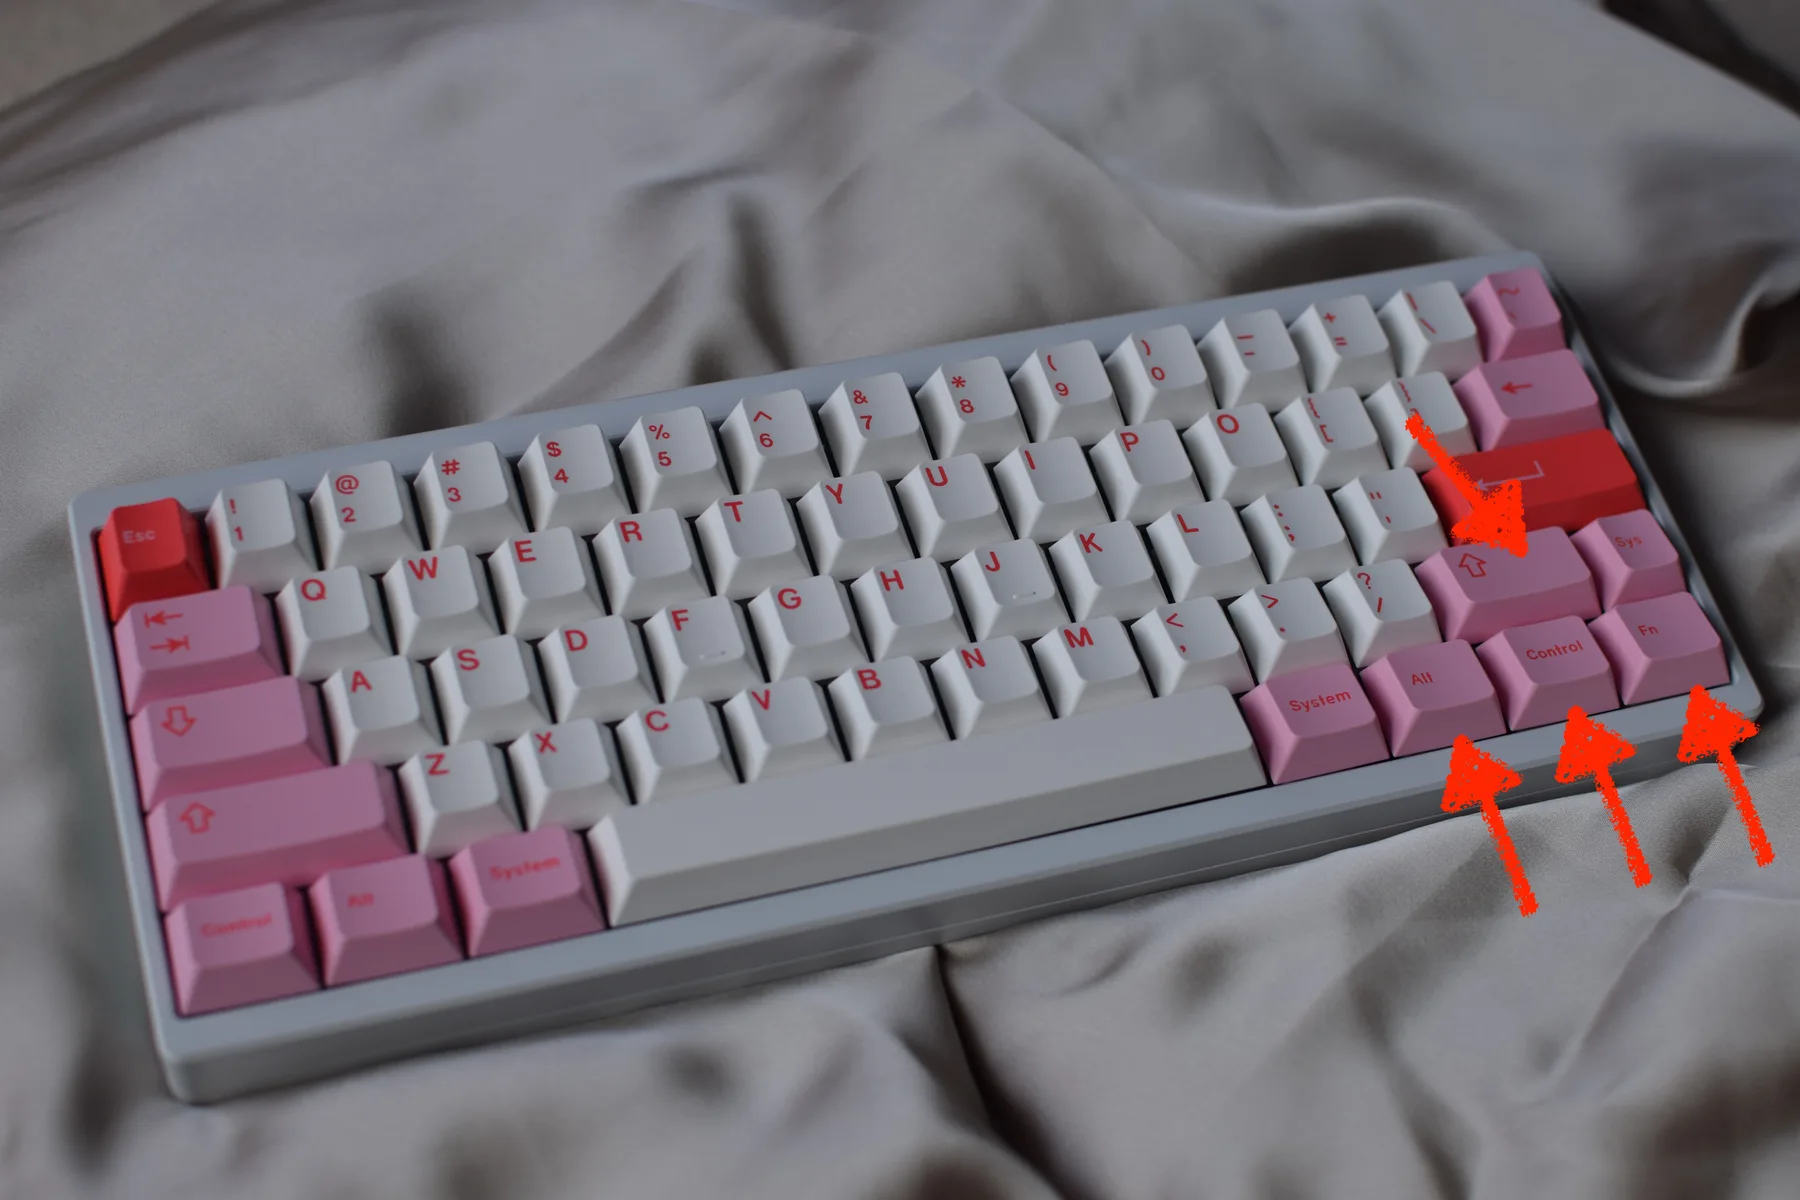
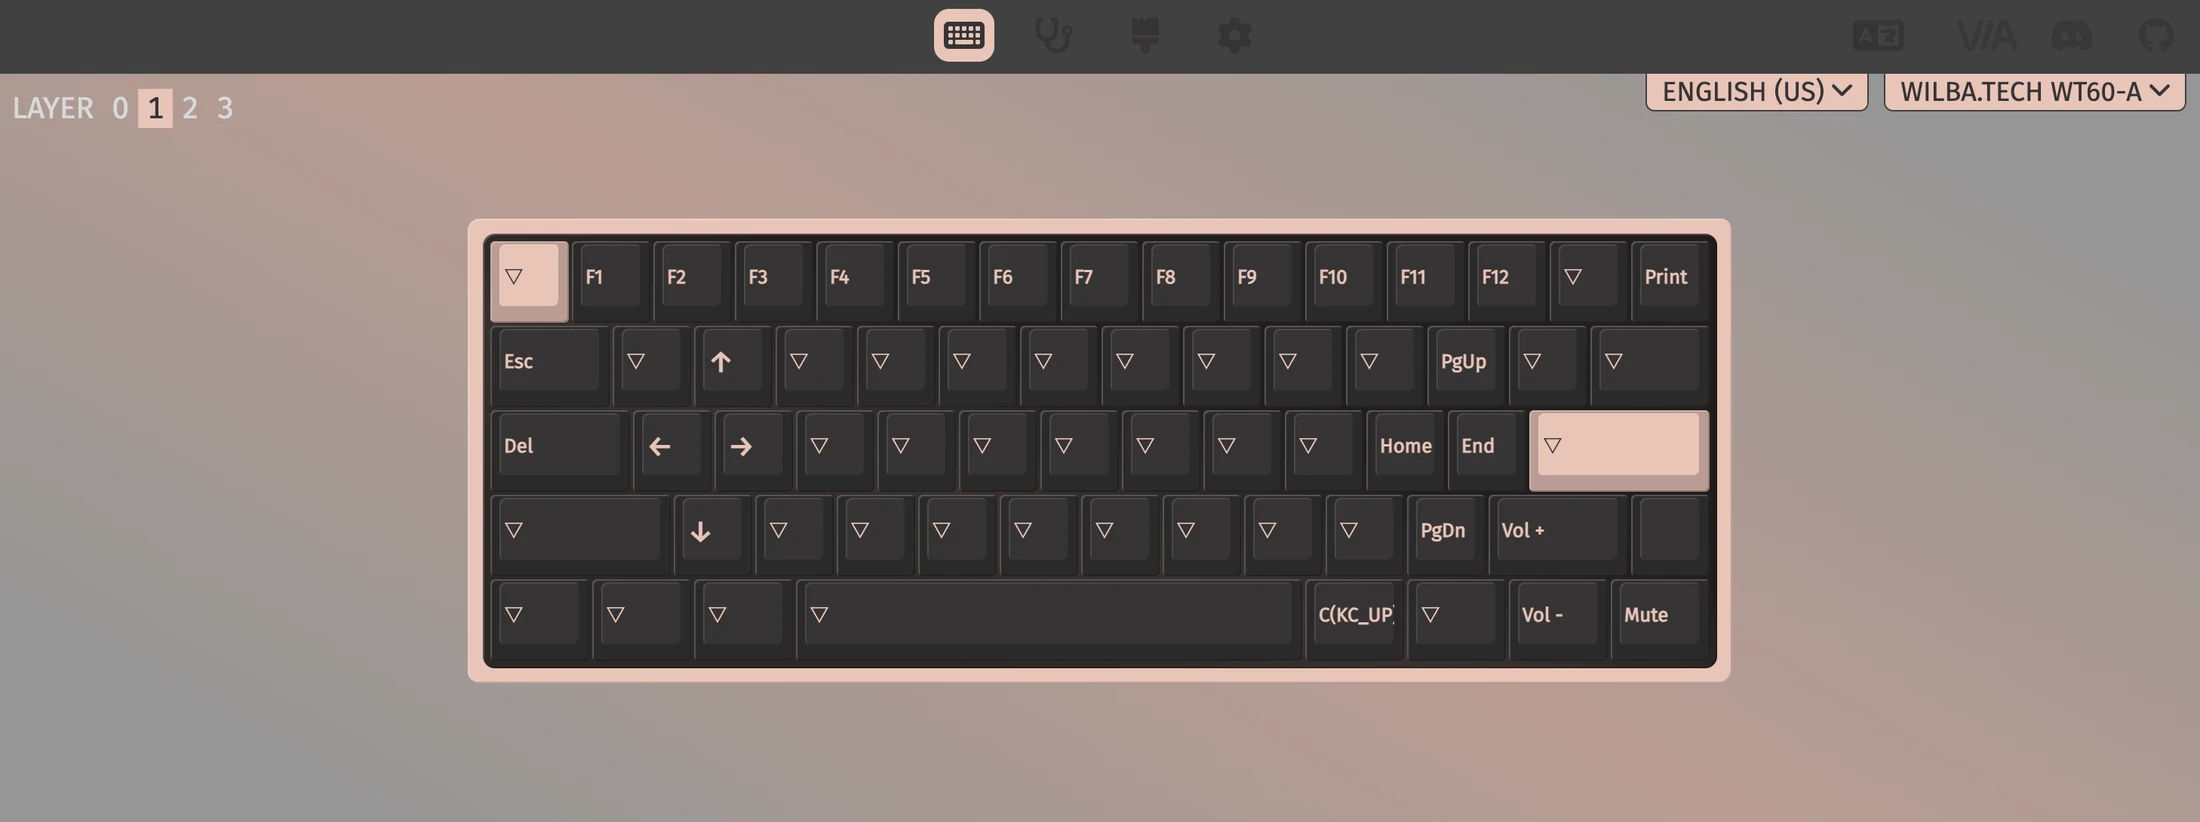
Arrow access is the hardest adjustment for me on a conventional 60%. In VIA, I set the wide right Shift position to Up and the three keys marked Alt, Control, and Fn to Left, Down, and Right. All four are on Layer 0, the layer I normally type on. I can move the cursor with one key and use left Shift when I need to select text. The red pointers show the positions. The VIA screenshots below show what each key actually sends.
Try a normal typing motion before you change anything. Place your right hand where it normally sits and reach as if you were going to move the cursor one character left. The position that feels natural on a 65% may be available on a 60% as a modifier. Reusing the area makes the motion familiar. The next decision is how you want to reach the arrows and how often you need the functions already assigned to those keys.
A direct assignment sends an arrow from the chosen position on the active layer. This gives you single-key access. You can use a modifier elsewhere when one of the reassigned positions previously sent Shift or Control. Keeping another working layer key is especially important if you move the rightmost key and it used to be how you reached Delete or F5. Before you remap, identify a working way to get to every layer you use.
A momentary layer keeps your typing layout available. You hold a layer key while using the arrow positions, then release it to return to typing. QMK describes the momentary layer switch as MO. Check that the layer switch can still release correctly on the active layer and that its original position behaves as intended. If you use the arrows in short bursts, you can keep the layer key held while moving several characters instead of pressing it again for each direction.
A tap and hold assignment can give the position two jobs. For example, with QMK Mod-Tap you can configure a key to act as an arrow when tapped and as Shift when held. Wooting documents a similar arrangement in Wootility for the 60HE. Check what the exact PCB and firmware make available in VIA. A tap that sends Up and a hold that acts as Shift change what happens when you keep that same key down. A dedicated arrow can keep doing its own job while you hold it.
Open the configuration for the exact board revision you are using. Save a copy of your current keymap before moving several keys. In the VIA Keymap view, start with the layer that is active when you normally type, then check the layer reached by your Fn key. Make one change, test it in a text field, and check the neighboring modifier keys as well. A simple test is to type a sentence, move the cursor one character, and confirm that you can still capitalize the next letter with the Shift you intend to use.
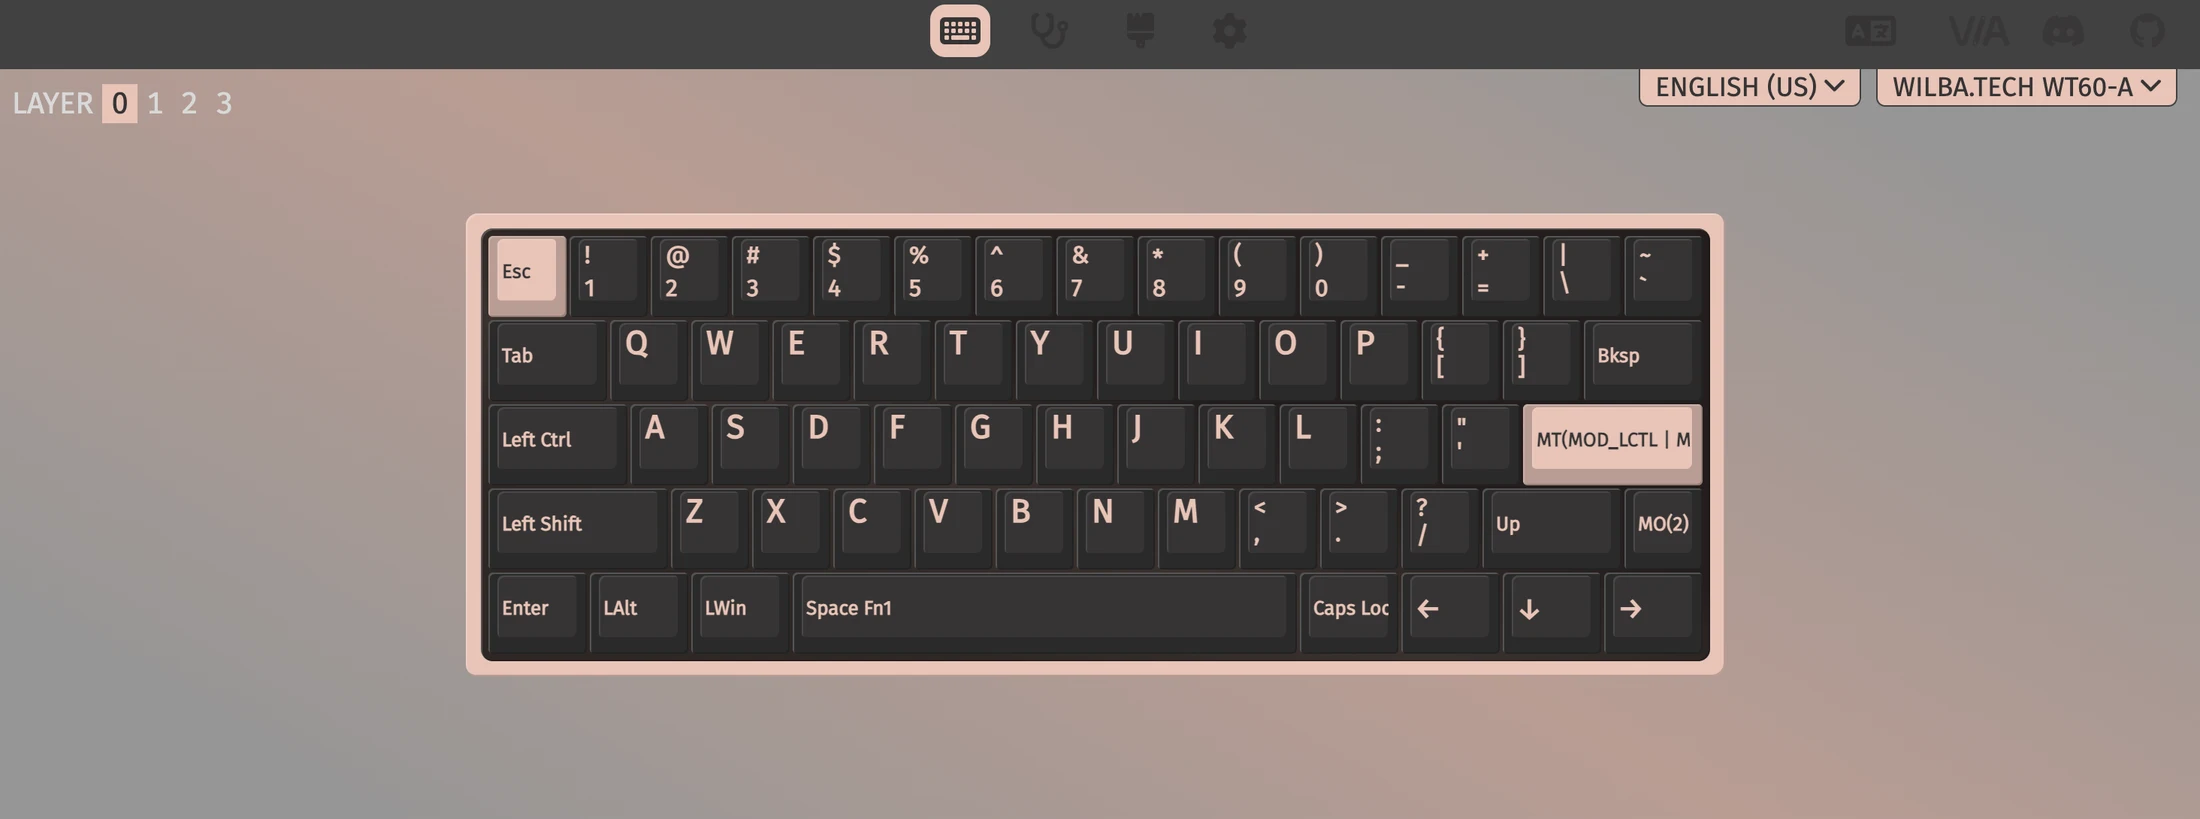
60% VIA keymap on the Wilba.Tech WT60-A
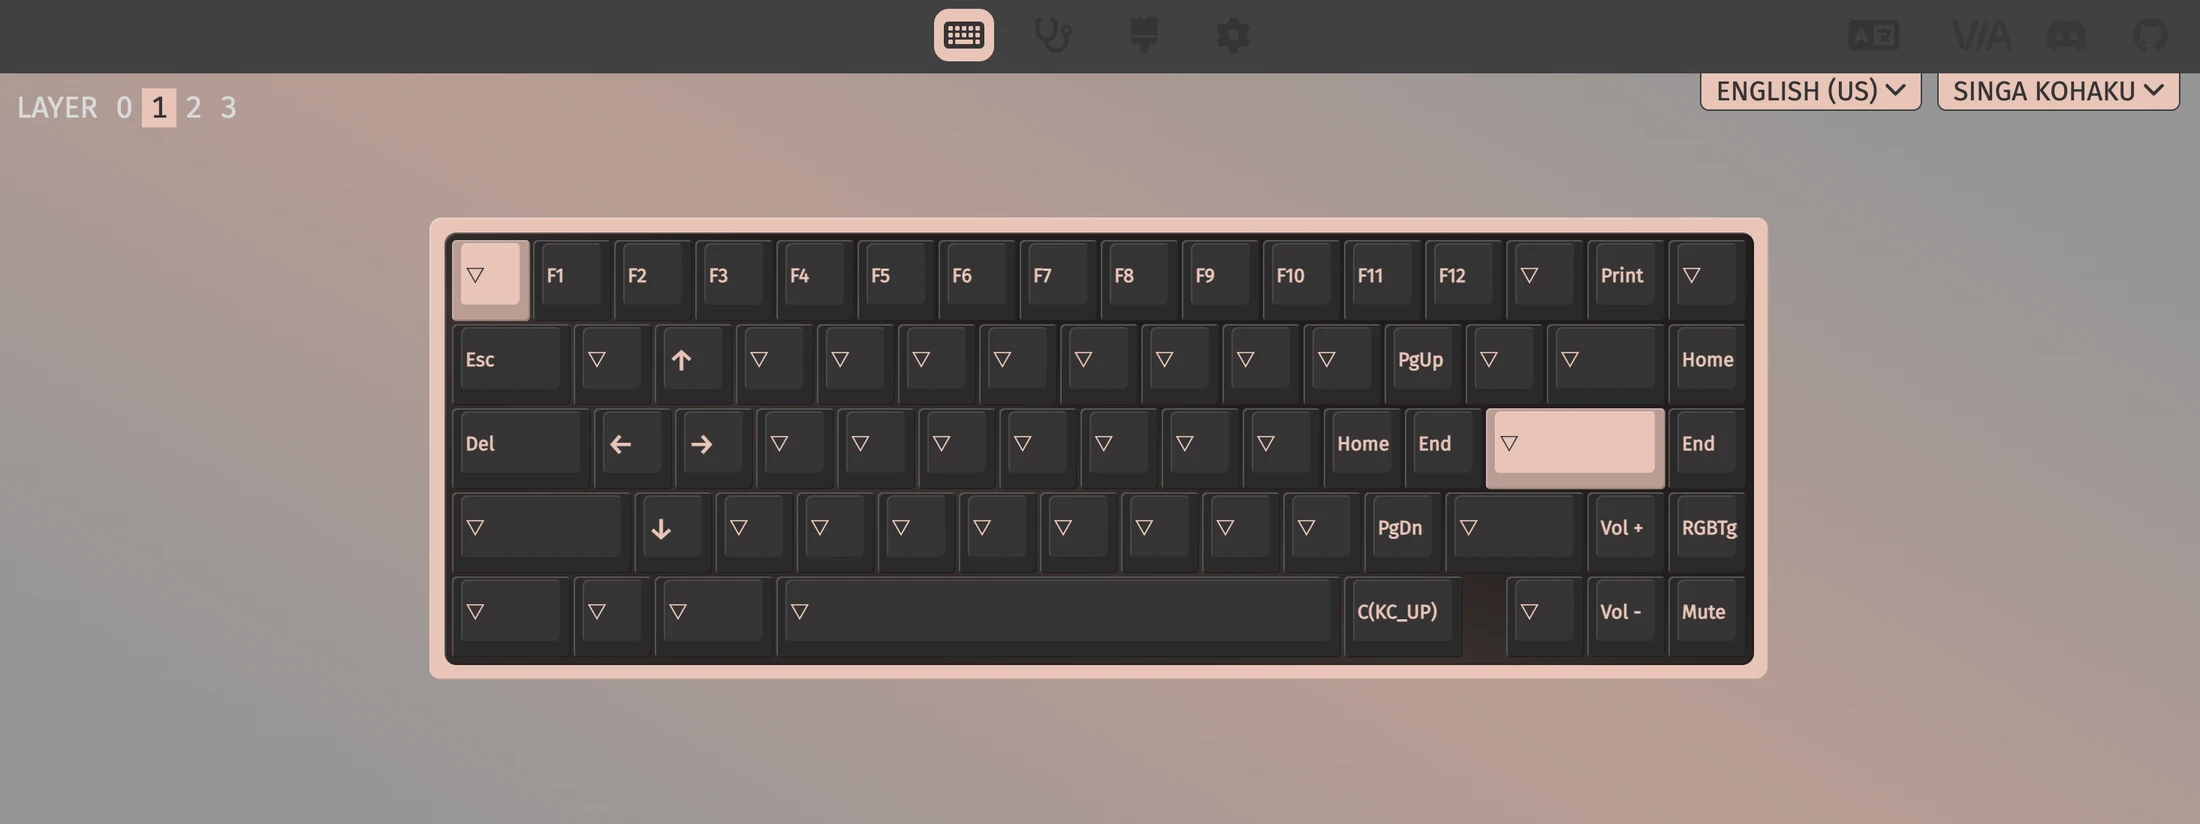
On Layer 0, the four right-hand positions are direct arrow keys. VIA shows the spacebar as Space Fn1. Tap it for a space or hold it to reach Layer 1. There, W sends Up, A sends Left, S sends Right, and Z sends Down. That gives me a second set of arrows under my left hand alongside the function and editing keys.
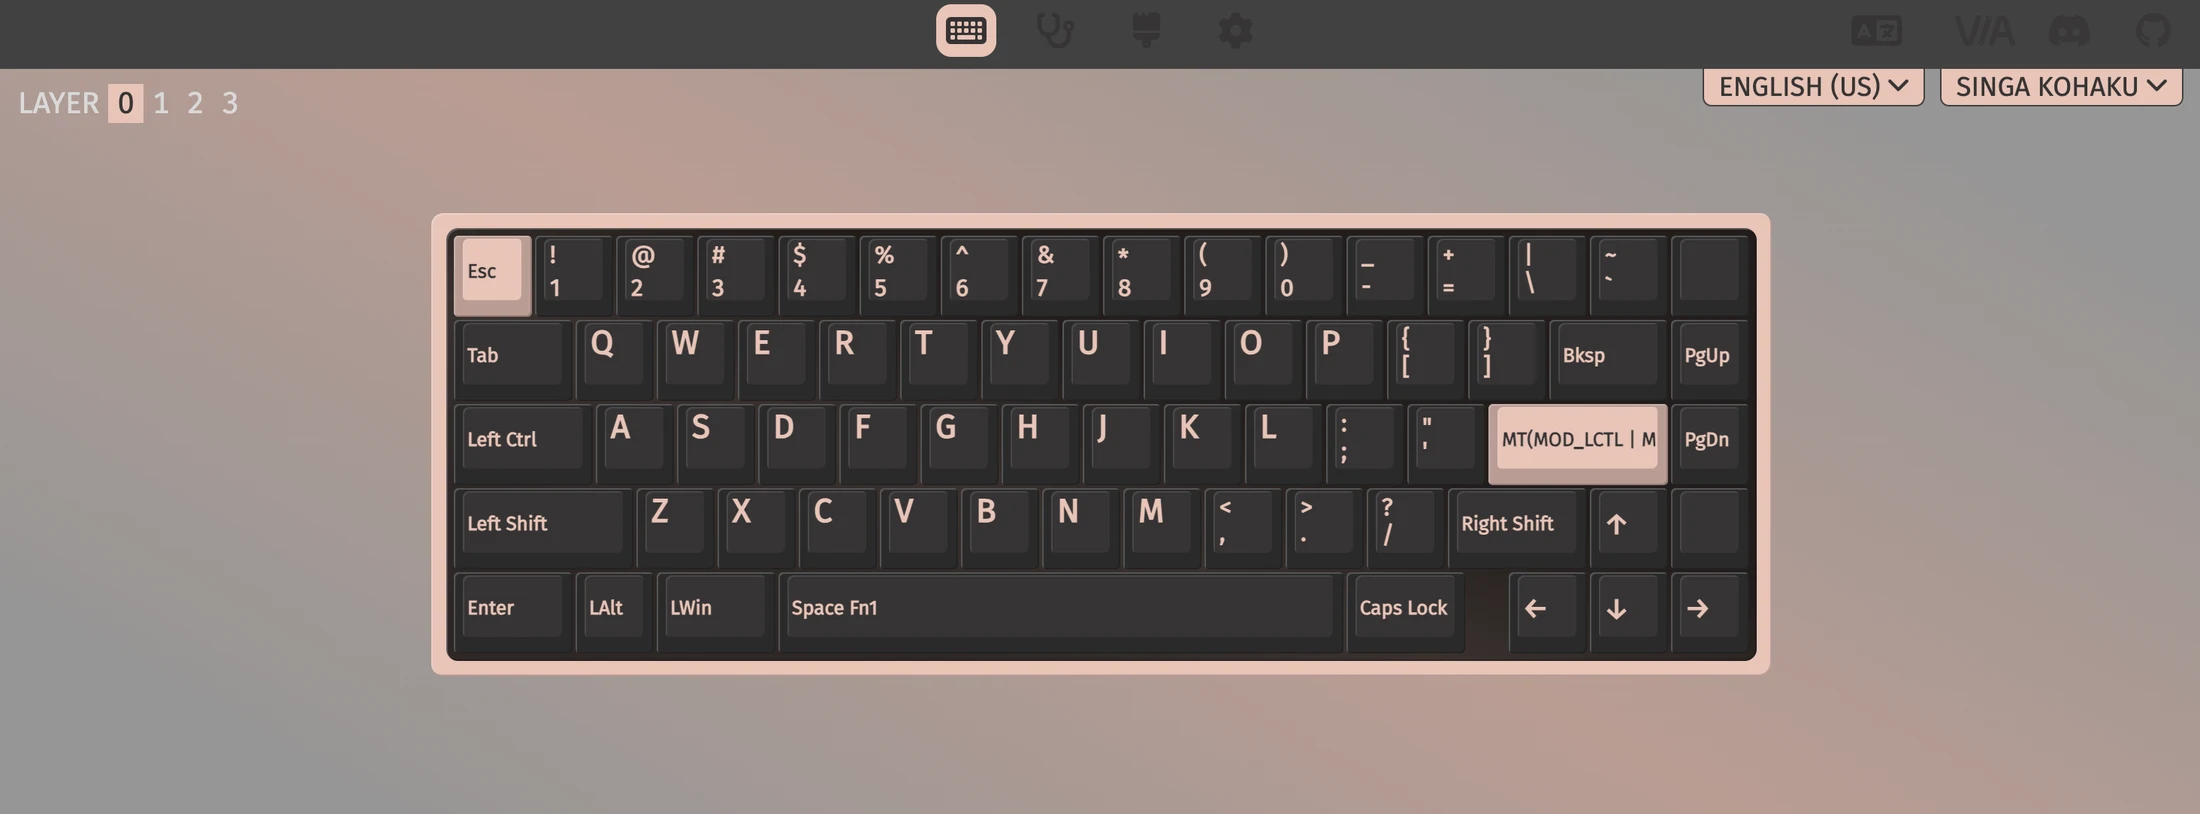
65% VIA keymap on the SINGA Kohaku
The Kohaku’s physical arrow cluster leaves right Shift available on Layer 0. Page Up and Page Down also have their own keys in the right column. I use the same Space Fn1 and W, A, S, Z assignments here, so the left-hand navigation shortcuts carry over between the two boards.
4. What changes when you edit text?
Picture a mistake halfway through a sentence. A single arrow tap can take the cursor back to it. Selecting several letters adds a modifier. Crossing a longer stretch of text can mean holding an arrow until it repeats. Those three motions feel different even though they all use a direction. When you consider a layout, make sure the mapping handles the motion you actually use when editing.
The table compares a 60% with arrows on an Fn layer with my two VIA keymaps above. On both of my boards, I use the same shortcuts for forward Delete, Home, End, and F5. The difference shows up when I want to hold right Shift and use an arrow at the same time.
For a simple comparison, open one app and use the same sentence on both boards. Try moving the cursor to a typo with single presses, then hold a direction to move back across the sentence. If a remap takes effect on a tap, holding that key may perform its second job before the cursor moves at all. In that case, see whether you already have another arrow on a layer for longer movement. This detail is easy to miss if your only check is whether four taps produce four directions.
For text selection, notice which hand you normally use for Shift. On the WT60-A I hold left Shift and use the arrows with my right hand. On the Kohaku I can still use right Shift. Try your usual gesture, including selecting up or down across several lines. If you select a word using an additional modifier, test that combination in the same app too.
Use a second task if you mainly type in spreadsheets or edit timelines. Moving the cursor around prose and moving a selection across a grid place different demands on the same keys. Record the actual shortcut you use for moving one cell or stepping through a timeline. Count when you need to keep Fn held, and note where your hand moves. Compare any missed commands before judging whether one setup feels quicker.
- Pick a sentence and move one character left, four characters right, and then to the start of the line.
- Select two characters to the left without lifting the hand that normally holds Shift. Try again with a longer selection.
- Use forward Delete and your most common F-key shortcut. Confirm that you can reach both without switching into a layer you might forget to leave.
| Action | 60% with Fn arrows | 60% WT60-A in VIA | 65% Kohaku in VIA |
|---|---|---|---|
| Move one character | Hold Fn and press the mapped direction | Press the remapped arrow on Layer 0 | Press the dedicated arrow |
| Move across several characters | Hold Fn and the direction if the mapping repeats | Hold the remapped arrow on Layer 0 | Hold the dedicated arrow |
| Select text with Shift | Hold Shift and Fn, then press the direction | Hold left Shift and press the remapped arrow | Hold either Shift and press the dedicated arrow |
| Delete forward | Use the shortcut documented for the board | Hold Space and press the Layer 0 Left Ctrl position | Hold Space and press the Layer 0 Left Ctrl position |
| Send Home or End | Find Home and End on the board’s layer map | Hold Space and press semicolon or apostrophe | Hold Space and press semicolon or apostrophe |
| Send F5 | Use the board’s F-row layer | Hold Space and press 5 | Hold Space and press 5 |
| Send Page Up or Page Down | Find the keys on the board’s layer map | Hold Space and press left bracket or slash | Press Page Up or Page Down in the right column |
The Fn column assumes a momentary arrow layer. The other two columns show the assignments in the VIA screenshots. Key repeat and editing behavior depend on the operating system and application.
5. 60% vs. 65% typing sound
These recordings put two related O-ring builds side by side. The Bakeneko60 has a raw aluminum case and an aluminum switch plate. The Mikeneko65 has an aluminum case and a polypropylene switch plate, often called PP. Both recordings use Mode Tomorrow tactile switches. The Mikeneko65 design comes from the Bakeneko65 v3 project. An O-ring supports the assembly in both builds, which gives the two recordings a shared mounting approach.
Start with the letter keys at each timestamp. Listen for the impact at the end of the downward stroke, which is the bottom-out, and the shorter return sound as the key comes back up. Then listen to the end of a short burst of typing. The tail between keystrokes helps you hear whether the sound feels concentrated around the initial strike or seems to linger after you stop. Use the spacebar as a separate reference because its cap and stabilizer are much larger than those of the letter keys.
When we want a fuller, more spacious sound, we often prefer a 65% build. We use fuller to describe the impression of more body after the initial impact. A richer sound can include a lower note, a more obvious tail, or both. In these clips, listen for how much sound you hear after the initial strike, especially when typing briefly stops. If a tail dominates the next keystroke, you may hear the same quality as hollowness or ringing and prefer the more concentrated sound.
The dimensions and shape of the air space beneath the assembly can affect how it resonates. A wider case can give a designer more room, and the actual cavity is determined by its depth, walls, internal parts, and damping. The plate and case also vibrate when you type. The switch plate in the 60% here is metal, and the 65% uses a polymer plate. That difference can change how an impact reaches the rest of the keyboard. The mounting points, stabilizers, and the amount of damping can matter as well.
Treat what you hear as the sound of these two assembled keyboards. Their keycaps and desk mats differ, and the recordings were made separately. The videos do not establish a matched microphone position or gain. Listen for the character of the strike and the way it fades at a similar playback level. Use the Keyboard Switch Sounds Guide for examples of how bottom-out, ping, and other sounds can overlap in a recording.
When a sound sample makes you favor one of these layouts, write down the quality that stood out. If it was the sharp first impact, look up the switch and plate together. If it was what happened after you lifted your finger, pay particular attention to the case, the mount, and the stabilizers in other examples. Sample recordings of the build you intend to make can help you choose a case or plate once you know the physical layout you want to use.
| Recorded build | Case | Mount | Switches | Plate |
|---|---|---|---|---|
| Bakeneko60 (60%) | Raw aluminum | O-ring | Mode Tomorrow tactile | Aluminum |
| Mikeneko65 (65%) | Aluminum | O-ring | Mode Tomorrow tactile | Polypropylene (PP) |
6. Which 60% layout and keycaps fit?
Once you know how you want to reach the arrows, check the physical layout in the product’s build sheet. Two boards sold as 60% can move keys between rows or split a wide key into two switches. VIA can change what a switch sends, and the plate and PCB still determine where the switch sits. For a kit with more than one supported layout, check the diagram for the PCB you are actually buying.
A familiar 61-key ANSI example has a wide Backspace at the top right and a full-width right Shift. An HHKB-style example normally places Control where Caps Lock would be on ANSI, moves Delete to a position above Enter, and splits the upper-right positions differently. The original US HHKB layout also has gaps at the corners of the bottom row. Custom boards inspired by the HHKB can use their own bottom-row and switch arrangements, so compare the diagram with the exact board.
The short Shift is the part many people notice on a 65%. A common arrangement makes room for Up with a 1.75u right Shift, while a standard 61-key ANSI right Shift is 2.75u. Here 1u is the width of an ordinary letter key. Count units using the layout drawing or check the size printed on the cap-kit sheet. Check the bottom-row modifiers too. A set can supply all the letters and still be missing a short modifier that sits next to the arrow cluster.
Read the navigation column by row if your new keycaps are sculpted. A Delete cap drawn for the number row may have a different shape or height from a Delete cap on a lower row. Check both the legend and the row position. A uniform-profile set gives you more freedom to move a 1u navigation cap around. For a sculpted kit, pick the row your own keymap will place it on.
The final fit check is the spacebar and other wide keys. Identify its width and stabilizer positions. Match a split Backspace or split right Shift to the supplied kit diagram before ordering. For a build that uses several variants, mark every nonstandard size on the PCB layout and check each one against the kit. The GMK Keycaps Guide shows how to read kit drawings and check which keys are included.
If you want arrow legends on your remapped 60%, check the size of the positions in the photo against your own layout. The four arrow caps from another board may be 1u each. A right Shift position may be wider, even when it sends Up. You can keep the original legends while learning the new positions, or check whether your kit includes blanks or symbols in the appropriate sizes and rows.
7. Should you buy a 60% or 65% keyboard?
If you write and edit all day, start with your navigation habits. If your right hand goes to the arrows every time you revise a sentence, a 65% gives you the same direct motion without assigning another function to those keys. A 60% can work when you like using arrows on a layer or you prefer the remapped right-side positions. Run the selection and held-arrow checks before treating those approaches as interchangeable in your own work.
For games, check the controls you use in actual play and menus. Both layouts leave the main letter cluster. A narrower case can free up space for a wide mouse sweep. If you use arrows for movement, menus, or a replay timeline, check whether you need those keys while also holding a modifier. The layout choice answers where the keys are and how you reach them. If you care about a switch technology or game feature, verify it on the exact model.
For a keyboard that travels, consider bag width, case height, and weight. The wider model may have the better balance for your bag if it replaces a board and an extra accessory. If you can already reach every command you need on a 60%, its smaller footprint may be useful in a shared workspace or beside a laptop. If you switch among several keyboards every day, try to keep the shortcuts you rely on in predictable positions.
For a first custom build, work backward from your least flexible choice. If you want a particular case and PCB, look at the physical layouts those parts support. If a particular keycap kit is already on your shelf, check the right Shift, bottom row, and navigation caps before buying a kit with a different layout. If your priorities are sound and simplicity, listen to a build you can realistically match, then decide whether its key layout works for you.
Try your preferred navigation method on a programmable keyboard you already own, if you have one. Put the arrows on a layer for a few ordinary editing tasks and notice when you instinctively reach for the physical keys. A single afternoon can reveal a shortcut you rely on even if you are still getting used to the smaller board. Keep that observation with the dimensions and keymap when comparing two candidates.
8. Before you order
Save the layout diagram and the keymap for the exact model or PCB revision. Those two pages answer different questions. The diagram shows the positions you can physically press. The keymap shows which commands those positions send.
When the difference in width is the deciding factor, mark both dimensions on your desk and try your normal mouse motion. When your concern is the arrow cluster, write down which editing commands you use on a typical day and confirm where each one lives on the candidate board.
- Check the arrow cluster, Delete, Home, End, and the way you access the F-row in the manufacturer’s keymap.
- If you plan to remap, check the exact board and PCB revision for VIA or the maker’s configurator. Confirm that it supports the behavior you intend to use.
- Match the right Shift, bottom-row modifiers, spacebar, and navigation-row keycaps against the kit before ordering.
- Check the published case width, depth, and weight for your desk or sleeve. Use the listing for the exact variant.
- Compare recordings with a known plate and switch combination if sound will determine which build you choose.